http://www.youtube.com/watch?v=bt97Jomj5nw
Very inspiring/ emotional.
Wednesday, 29 January 2014
Friday, 17 January 2014
PERSONAL PROJECT EVALUATION
For my independent learning agreement I decided to use the theme 'Family'. After a lot experimentation and research I finally ended up with portraits I really wanted! Using the Hasselblad camera has made me realise it's my favourite camera to work with, I feel so comfortable using it now after a lot of experimenting. Comparing my first photo shoot were the photos are really dark and dingy, I had to make a lot of changes. Firstly I decided to take the photographs outside, as I felt the natural lighting really enhanced the subjects in each photograph, next I used a natural background which made the subjects the focal point in each shot. Finally I used a tripod to ensure that the images were in sharp focus which is vital.
Printing has been really good for me this year, I feel I have progressed a lot in terms of taking my time to ensure the end process is how I want it to be and also by pushing myself for perfection rather than satisfactory.
I feel I have fulfilled all of my learning outcomes slowly with a few hiccups along the way, although my mistakes have got me to were I am now which makes me happy. My first learning outcome was to communicate effectively using a range of formats which I have completed by using the Hasselblad camera, processing and finally printing. I have also gained a lot more confidence working with close relatives and working with a film camera has helped me become independent in terms of working alone and focusing on a subject that I have chosen myself.


I took this image of my Aunty Ali at her own home also, I love her facial expression, again creating a really positive atmosphere. The central composition makes the viewer concentrate on the subject rather than anything else- which is exactly what I wanted to portray.


I was so happy with this print because It was exactly the image I had in my head for the outcome, also previously on my blog if you compare this photograph to my previous image of my dad you can see the progress I have made using the Hasselblad camera.

Overall I am so pleased with the outcome of these images from my final personal project, not just because it has enabled me to be more confident and independent but also because I love my family and I was happy to know how pleased they were with my final images. I feel easier talking to people and making them feeling at ease whilst taking a photograph - which I used to struggle with.. making the subject feel relaxed really shows in the photograph!
From this I now know how to control time management and plan my own project which is VITAL to my education and my future photography profession.
FILL-IN FLASH EVALUATION

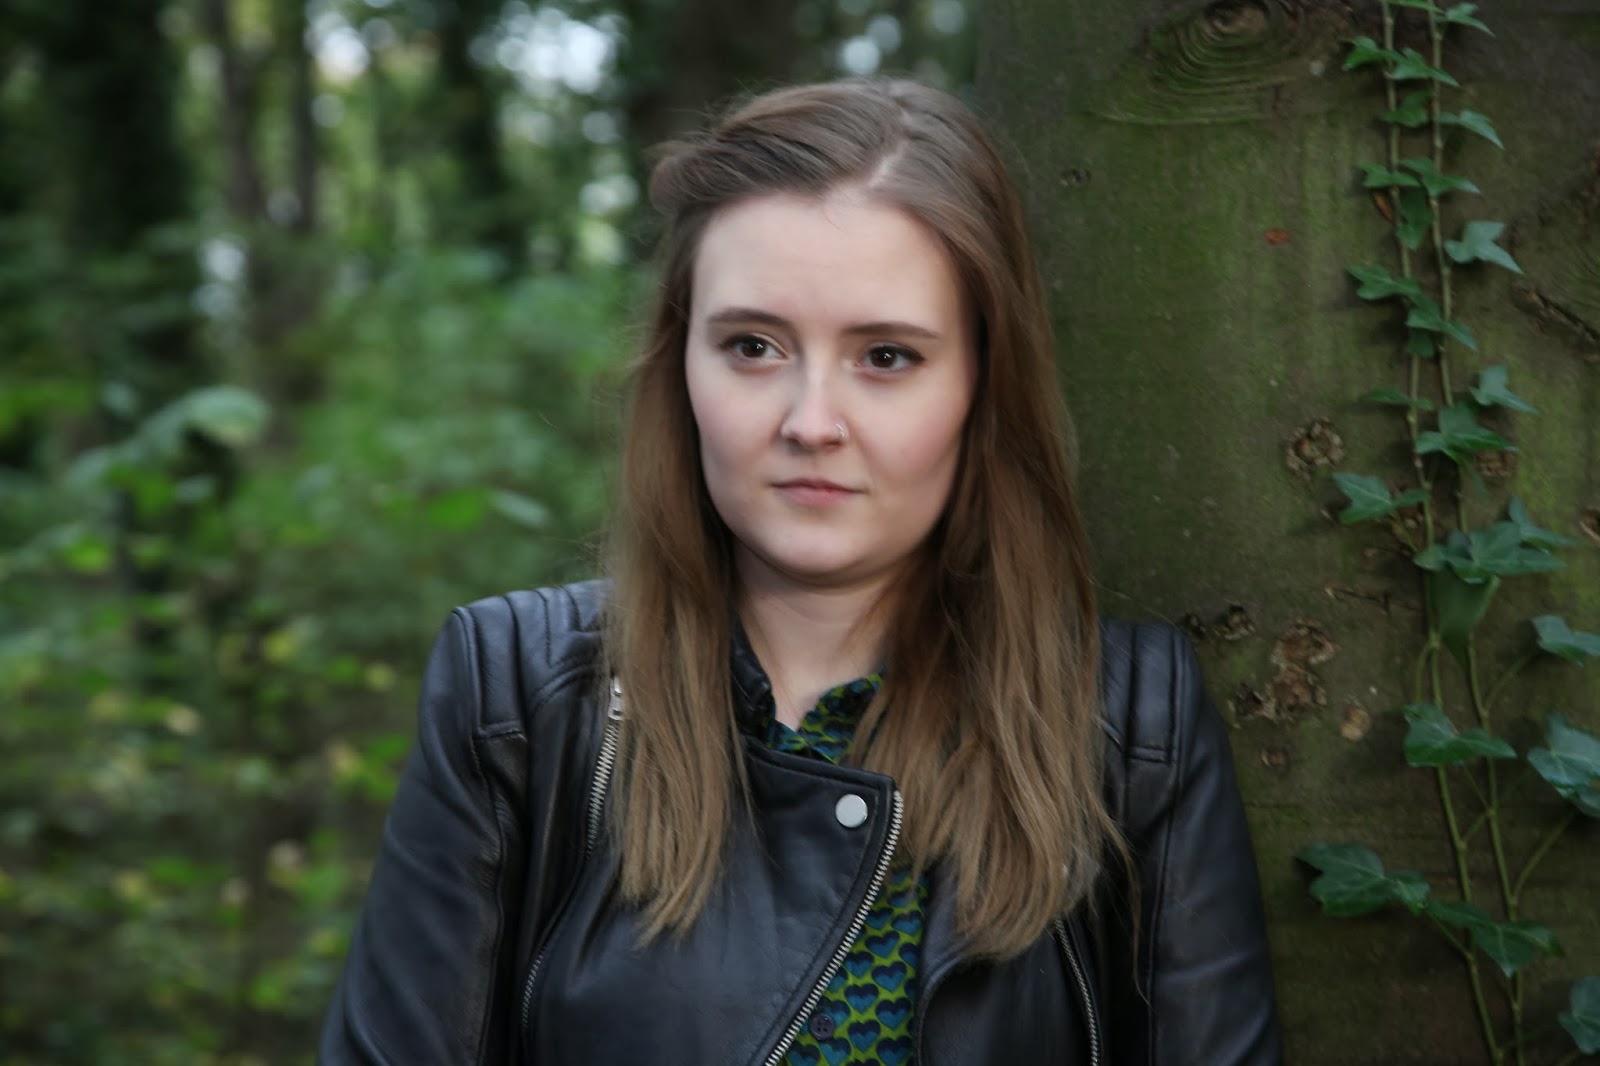
So here is my final fill-in flash photograph! I took the photograph in Greatham Woods, Hartlepool of my friend Steph. I printed 20x24inch which was a "Light Jet" photographic digital print. After using the fill-in flash for the first time I fell in love, I love how the flash illuminates the background.. Its fascinating how much of a difference the fill-in flash has to a photograph without a flash.
I have decided on this particular photograph as my final photo, mainly because of her facial expression.. this creates a distant look as if she is deep in thought about something. It sort of reminds me of a film noir style (especially after I edited it black and white), I also love the natural lighting which you can see on the side of her face, this just adds extra contrast to the photograph as well as the fill-in flash.
I decided to edit the photograph black and white using photoshop because I feel the image became a lot stronger and also makes the viewer be less distracted by colour.
I love the trees in the background I think it creates a really mystical mood to the photograph, and helps to make the subject become the focal point of the shot.
Whilst using the fill-in flash I have developed confidence working outdoors and also with people, I have been able to demonstrate the ability to experiment with a range of equipment and manage my own work properly which has enabled me to become a lot more independent.
5X4 EVALUATION
Working with the 5x4 camera has certainly been the hardest part of the Portraiture brief, although I struggled at times I have thoroughly enjoyed it. When I first began shooting I found myself quite worried as we had to wait a few days to get our negs back, a few times when I had my negs returned the images did not come out, due to being exposed and under exposed. However, the more I worked with the camera the more comfortable I started to feel using it. Printing was also difficult at first as I had never experience using the colour dark room before, however once I got the hang of it and using the filters correctly it wasn't to bad.. printing 20x24 is the biggest I've ever printed and I was quite proud of myself. After printing and printing and printing, I started to get the colours neutral to how they looked in real life. Overall in this project I have developed my technical skills by using a large format camera, I also feel confident to use the camera in the future, and really enjoy printing colour.
Below is my final close-up, mid-length and full-length photographs..
Below is my final close-up, mid-length and full-length photographs..

This photograph was taken of my friend Steph, this is my close-up final shot. I love how her face is the main focus of the full image, with her neck and background blurred. The direct eye contact creates an intense serious mood to the viewer. I love the natural skin tones of her face and the closeness that enables the viewer to get up and close to her face.
I also intended for the background to be plain brick as I wanted to portray a subtle portrait.. This image reminds me of a album cover, I love her careless expression and the intense mood the photograph.
I also intended for the background to be plain brick as I wanted to portray a subtle portrait.. This image reminds me of a album cover, I love her careless expression and the intense mood the photograph.

This is my mid-length final photograph of another one of my friends, Lauryn. I love the models expression! It really creates a warm happy mood, also contrasting with her warm red hair colour. The plain brick background enhances the subject to stand out becoming the main focus of the photograph. I wanted the composition to be central, however, some space above the models head to create a plain background around her and also to create a mid-length shot.
I also am pleased with the way her hair is slightly blurred, this creates a sense of movement to the photograph. This is probably my favourite out of the three images.
I also am pleased with the way her hair is slightly blurred, this creates a sense of movement to the photograph. This is probably my favourite out of the three images.

This is my final full-length photograph of my uni friend, Reece. I am very happy with the outcome of this print.. although his face is out of focus, which could be a small concern.. although I felt it takes the distraction from his face and allows the viewers to look allover in the image rather than just his face.(Like the close-up shot of Steph). I took this shot at the Gare whilst visiting with university to take photographs (Apart from the rain it was a productive day). The green background and brick floor really contrast together really well, creating a bright mood which allows the viewer to be slightly distracted from the subject himself.
I love the central composition of the photograph and how the floor of the shot is 1/3 of the image, it really is an interesting portrait. His facial expression creates quite a serious mood, with his direct eye contact and the way he is stood.
Steve Pyke - Moonbug
http://www.youtube.com/watch?v=wqMuKFii3Hc
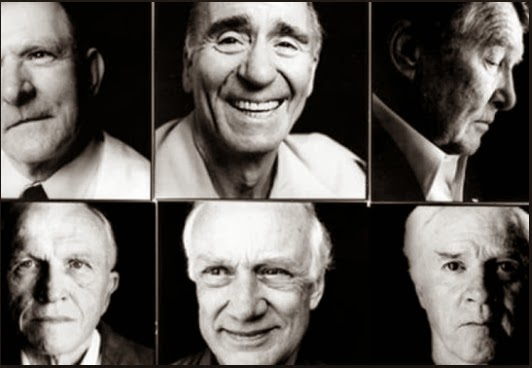
When we first got introduced to our final personal project we were shown a DVD named 'Moonbug'. Steve Pyke set out on a journey across America in his search to meet and photograph the Apollo space pioneers. The footage is very rare and interesting, its actually very inspiring to see the way Steve Pyke works with the Apollo space team and the way he seems to make it look so easy taking photographs on the Hasselblad. He has a very good way of speaking to people and making them feel extremely comfortable. The Dvd id both a photographic road trip and an exploration of how photographs become signposts for history.
The DVD made me feel a little uncomfortable as I was thinking about when I shoot the Hasselblad for myself and also how easy he made it seem whilst having a casual conversation with all of the Apollo Team. However, it gave me a little confidence to see how exciting the experience must have been.. also the outcome of his images are amazing and very defined.
Here are a few of his photographs below...
As you can see above the black backdrop Steve Pyke uses throughout photographing the Apollo team, really enhances their faces. Also it sort of reminds me of them being on the moon with the lighting he has used- I love this. The contrast of the images really make their facial features stand out and create quite dramatic shadows.
My action/time plan
I began shooting the Hasselblad camera on the 12th December '13, shooting my friend Kristal, and getting use to working with the camera as well as figuring out which depth of field, lens and lighting I wanted to work with leading up to my final family photographs.
I developed the roll of 120 film and decided I like the close-up images of Kristal, which I feel enhances the subjects facial features.. I was using an 80mm lens.
In January, I began photograph my family members in there own homes, as I want them to feel comfortable and also I would like quite a documentary style to them.
As you can see from the post previously the photos were really dark and I was very disappointed with the outcome.
However I know what mistakes I made, therefore I can ensure myself what not to do and what I need to now do with my final shoot.
Irving Penn
Irving Penn created some stunning portraits both fashion and natural. I found out some quite interesting information about Irving Penn whilst researching into portraiture, I find it quite cool that he originally wanted to be a painter, however, after a job in Vogue he began taking photographs - although to me you can still see his artistic talents within his portraits, as the are very close-up and intimate almost like a close-up painting.
I love his use of dark backdrops in each photograph, as you can see it really enhances the subjects faces, and allows the models to be the central focus in each photograph.
This is why I want to use a plain brick wall, or a one-tone background, as I've realised it makes so much difference to the portrait and allows the model's face and features to be striking to the viewers.


Thursday, 16 January 2014
Informal Portraits
Quoted from The Photographers hand book. I found this relevant to my personal project and my aims- As I would love the viewer to look at my final images and see the development from beginning stages of shooting and compare them. I also have decided to shoot my final photos outside, as I think the outdoor lighting is more natural to studio lighting. I will be working close-up focusing on the subjects faces.
'Informal portraiture away from the studio allows you great scope for adding touches of local environment. At the same time you cannot afford to be quite so concerned with details of lighting and composition. You must choose the moment that captures expression and momentary pose together.
Be prepared to make rapid decisions on the use of existing shapes and lighting to form an image which is interesting and strong. This usually involves compromise relative to the controls you would normally exercise in the photographic studio. Sometimes by working in close-up and using existing light it is possible to result similar to studio conditions, but with the bonus that the sitter is more relaxed.'
Hasselblad attempt no.2
After shooting 120 film in the hasselblad of my friend Kristal, I decided to shoot my family for the first time. It took a few days to shoot them all, I took all of the photographs inside their houses, because I thought the photos would come out in a Documentary style if the models were not posing and just sat naturally. However, the images come out really dark, the lamps inside the houses were not light enough to create a clear shot. I also didn't use a tripod and therefore they are also out of focus. These are the things I need to focus on for my final attempt of shooting. I was quite disappointed when I developed and then printed them because I feel the images portrayed quite a dull, depressing mood and there wasn't anything interesting about them- This is not how I want to portray my family! However, These are all things I will consider to ensure my final photographs are 100x better.
Here was my attempt anyway...


Here was my attempt anyway...
Richard Avedon
I thought it would be useful to include some famous Hasselblad lovers like Richard Avedon. I want my final photos to have contrast like the photograph below, with intricate detail giving the photo a really serious, gritty look. I like how the background is blank, it makes the subject really stand out.

'I hate cameras. They interfere, they're always in the way. I wish: if I could just work with my eyes alone. To get a satisfactory print, one that contains all that you intended, is very often more difficult and dangerous than the sitting itself. When I'm photographing, I immediately know when I've got the image I really want. But to get the image out of the camera and into the open, is another matter' - Richard Avedon
Hasselblad
I began my personal project by shooting rolls of 120 film, I was practicing which lighting techniques I prefer. As well as getting use to the camera itself.

I like the composition of this photograph and the models pose. I also like the use of black and white which makes the photo have lots of contrast.

Again similar to the shot above the subject is close up, showing mainly her face. The expression on the models face creates quite an intense mood with the direct eye contact and the expression.

Again I was experimenting taking long and short distance shots, I still prefer the close-ups... however, I do like the lighting in the image.

I quite like the composition of the model, however I don't think her facial expression is serious enough.. ha.
Personal Project
For this personal section of my portrait project I have decided to use the theme Family. To me personally family is more important than anything else, the closeness of a family is something that money cannot ever buy. In human context, a family is a group of people that are connected by consanguinity (which refers to the property of being the same kinship as another person), by marriage and shared consumption. I would like to photograph my close family within a series of images because I feel that the photographs of people that you are close to will mean more to me than a fashion shoot, which I hope the viewer can appreciate to.
I would like to document my family members in the locations I normally visit them which will create a documentary style and sense of realism. I have been looking at various portrait photographers such as Edward S.Curtis, Josef Von Sternberg and David Bailey. One of my many inspirations is Don McCullin, particularly one of his photographs of a 'Homeless Irishman' taken in East End, London 1969. When I first seen the photograph I couldn't believe the intensity and rawness which it portrayed.
Some of his photographs show the humans who have been pushed aside and ignored by our society; in my eyes the photograph speaks out, not in a distracting way but subtle. I believe the photograph implies realism in a documentary style.
These are the emotions I want people to feel when looking at my images, I also decided that I am going to use black and white film. I feel that using black and white film will create an atmosphere as the viewer will not be distracted by colour whilst looking at the different portraits of my family. I think the black and white will create a dramatic mood with different contrasting shadows. I have chosen the Hasselblad camera as I want my final photographs to have a square format, I also enjoy using the camera and I feel comfortable using it.
I am hoping that this final section of my portrait project will help me gain confidence and independence as this will be my first time planning a personal project. These skills are vital within the photography profession and this is the perfect opportunity for me to practice them. My aims are to develop an ability to experiment and be competent with new equipment, in terms of using the Hasselblad camera using different lighting techniques.
I also want to apply a creative thought process in my production of images, by using my family members. Although family photographs are quite common I would like to portray the photographs in a different way to mainstream. Family members all share personal information with each other that would not share with anyone else. The closeness between family members is very interesting, this is why I decided to photograph my family as a group separately.
I am determined to demonstrate a range of advanced techniques and processes, For example I will be shooting the photographs, using black and white film, processing it and finally printing them. I find it quite ironic that the camera I have decided to use takes quite a lot of time in comparison to digital, I also find it ironic because all spend a lot of time together and it felt right that I was using this method to complete this series of photographs.
Martin Par

Martin Par is one of my inspirations. The main thing I love about all of his photographs his use of colour, his images have so much contrast I can't help at each one of them.
His use of flash enhances the background as well as the subjects. The photo creates a relaxed mood as the models appear very calm as they are getting a lovely cold shower after laying on a hot beach.

Fill in Flash
I took the photographs below using fill in flash at Greatham woods. These photographs are unedited however I am going to use one as my final shot as I feel it fulfils the brief and I am satisfied with the lighting, contrast and also the background.
I have loved experiencing how to learn the digital fill-in flash technique and creating photos I am actually pleased with.
The difference of using a fill-in flash to not using no other light source than natural light is that the shadows from the background seem to disappear and make the full photo light up.


Fill in flash
'I'm known for taking pictures very close, and the older I get, the closer I get.'

Bruce Gilden - I like the way he holds his fill flash.
http://www.youtube.com/watch?v=IRBARi09je8
Watch the Video above shown to me last year by Antony Chambers. Very interesting, very street!
When I first watched the video above I found it fascinating how different people work differently whilst shooting, its interesting also to see how people react to people taking your photograph and also how some people are not bothered and don't react.


Larry Sultan
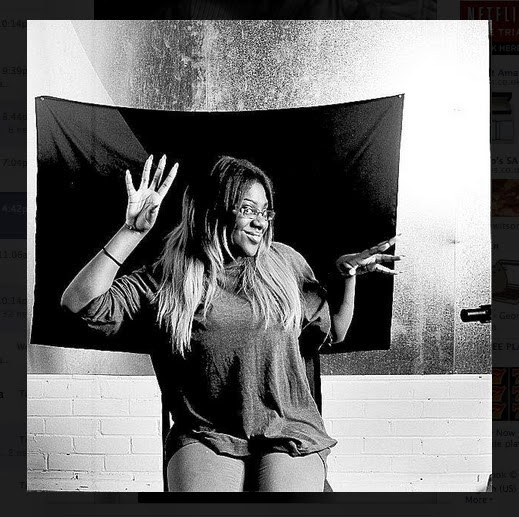
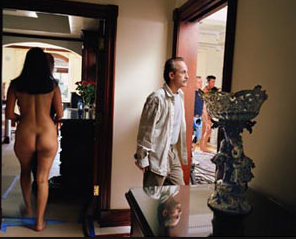
I found some of Larry Sultan's photographs quite interesting whilst looking at photographers who uses fill in flash. Especially his personal project 'The Valley'... which I found some interesting information about below took from http://www.brancolinigrimaldi.com/article/exhibitions-past-larry-sultan-the-valley&slide=on&image=4


Fill in Flash
Within our Portraiture project we also have to shoot a digital fill flash photograph. I was pleased to vary the use of cameras in the project (Having the advantage of using digital and film cameras) and found it quite exciting to use a fill flash for the first time- as I have only used studio lighting and cameras built in flash.
I thought the fill in flash photograph would be quite easy to take, however, it's actually quite hard to brighten deep shadow areas. Its vital to use the appropriate aperture and shutter speed to correctly expose the background, also adjusting the flash to the same exposures. Its easy to overexpose the subject, especially at a close range.
Below is a few of my first attempts at using fill in flash, I think I managed okay actually... these are unedited.
The flash was too bright in this photograph- as you can see the model's face appears far more lit up than anything else in the background. However, I like the background how the model is in focus to the blurry leaves. I would be satisfied with the photograph if her face was only a little less lit.
I picked the location of a forest, as I wanted the photographs to be in a natural setting. Here you can see the model's face stands out from the blurry background- I decreased the flash level a little from to the photograph above, as you can see her face appears more natural with the background, rather than making the model's facial skin tone disappear and appear ghost-like.
Susan Sontag
I read 'On Photography' by Susan Sontag about a year ago now, and I still don't understand the book fully but the more I read into it the more it slowly starts to make sense.
I've quoted small pieces from her book which has stuck in my mind as well as being important to me and inspirational to my work.
'A photograph is both a pseudo-presence and a token of absence.'
'Each still photograph is a privileged moment, turned into a slim object that one can keep and look at again. Photographs like the one that made the front page of most newspapers in the world in 1972- a naked South Vietnamese child just sprayed by American napalm, running down the highway toward the camera, her arms open, screaming with pain- probably did more to increase the public revulsion against the war than a hundred hours of televised barbarities.' - To me personally I think this quote is trying to say photographs create a bigger impact than words as well as a memory. The photograph took of the Vietnamese child is always stuck in my head, however I couldn't imagine what the viewers thought when they first seen the photograph at the time and the real impact it portrayed.
Ansel Adams
Although Ansel Adams did not particularly photograph people, he did use a large format camera. His work was more environmental, however, I did notice his photographs and was very inspired. (He is a environmentalist who photographs black and white landscapes) His stunning landscapes first caught my eye when I noticed the contrast of his images, it sort of makes them powerful in a way as well as also wanting to visit his locations where he shot the images - This is what I want to create in my own portraits.


Subscribe to:
Comments (Atom)